


Yep, besides thinking about how I will be spending a few hours this afternoon doing homework, there are a few other things on my mind...
*Did anyone see The Simpsons on Sunday night?
The Chicago references had me in hysterics...
"Chicago, The Miami of Canada!"
"Homer, you smell like Chicago."
*Anybody watching any new shows?
The kid and I liked Reaper the other night, quite amusing.
The kid also like Chuck but I wasn't impressed.
We also caught the Kitchen Nightmares show with Gordon Ramsey from Hell's Kitchen and it will definitely help me save money because after what I saw the other night, I may never eat out again!
*I'm watching some of my old favs like America's next top model, The Office (although I missed it last night) and Grey's Anatomy.
Did anyone else watch Grey's last night and think...eh.
It was so boring and again I am watching the show thinking...He's married...She needs to make up her mind...Do they ever work? Still think Season One was the best.
*When did High School become like College?
Here, all the good high schools have "selective enrollment", so you have to get certain grades starting in 7th grade and get picked to go there.
You even have to make your list of preferred schools and apply.
These are the public high schools people!
And if we don't get into one of the 5 schools we apply to...Looks like we are shelling out about $10k a year for private school. That is insane!
I'm going to a "fair" of the high schools tomorrow to see where we want to go and can get into.
*Going to a day long crop next weekend and I am already stressing about what to bring/pack.
How does everybody else decide?
I really don't want to plan out every page this weekend but I don't know another way.
*This digital kit to make your own tshirts is really clever!
*Went to the zoo on Wednesday (no school).
And a chimp was walking around with a burlap sack around his shoulders like a jacket.
Told the boys, "Check that out, he's dressed"
Then the chimp picked up a dead rat and stuck it on his head.
Glad the boys were old enough to just go..."Wow!" "Eww!"
There were a few little ones watching and looked horrified.
So did I.
*Who knows the cheapest place to buy envelopes?
I'm out and the prices I saw at OfficeMax and Staples have me thinking I'm not sending cards as much anymore.
*Love these Halloween Images and this and this.
*Wish I knew how to crochet better so I could make this little mummy.
*Has everyone seen the new Halloween line from Scenic Route, Salem? It is so cool because it isn't too Halloweenie so you can continue to use it past October.
*Don't forget there is all kinds of Halloween goodness over at my other blog, The Witches Cauldron.
That's about it.
Stupid factors and mutliples are taking up the other side of my brain temporarily.
Friday, September 28
Randomness
Owl Swap
I know I have been slacking on the blog lately and I appreciate everyone's understanding about my current stress level with a certain 6th grader. It looks like things may be settling down a little, so hopefully everything will go back to my usual stress level soon. {fingers crossed}
Now that my partner has received my Owl Swap package safe and sound, although a little soggy, I thought I would share the project that almost did me in.
You know those kinda projects, the kind that never seen good enough and seem to take forever to complete.
Well, here's mine. (pardon the pictures, indoor night time pictures aren't the best)
 All the projects use Scenic Route Sumner Line. I buy mine in the kit from my gal, Carol and I highly recommend buying it with the matching cardstock, makes any project a snap!
Here are the little extras I added in at the end.
Kept feeling like it just wasn't enough stuff, so I added this little candle and this cute little candy filled can that I made with Michele at a TAC demo with Kimberly.
Hope you don't mind that I changed it to the owl.
This little notebook is just a mini-legal pad with the front cover made from cardstock. I added that PP and the Hambly overlay. How about that stick?!! Like the nature-touch??
This is the card set's little envelope. That big owl is from Hambly, you don't want to know how much it was for one sheet...Sheesh! That paper lace is from Paula, she found it at her Dollar Tree and was so nice to send me some. (and being the boob that I am, still need to shoot her a thank you card, good thing she is in Italy) It is great because it already has adhesive on the back. I made this little holder, but don't ask me dimensions or anything because I just made it, didn't even pay attention.
 Here are the cards that were inside with matching envelopes.
See that paper?!! It's the Target Dollar Spot stuff, man, I wish I had bought more.
It was rather thin, but for cards it was perfect and I love the colors and patterns.
Oh, and see that little owl on the cards??
My buddy Elizabeth drew that little guy, isn't he cute!??
Thank goodnes for friends who share their talents because I can barely draw stick people.
 This was really the highlight of the whole package.
This is the project I made and then said, "Man, now I don't want to give it away!"
Ever have that feeling?
I made the little book all myself and really this is what took the longest.
The covers and divider pages are chipboard which I designed and cut myself.
That's an overlay over the chipboard cover by Hambly.
 Then there were sections for each of the To Do sections, like grocery lists, things to do online, for her daughter....you get the idea. Here are a few....
That little owl is again Elizabeths that I paper pieced.


 These were the list pages, so she can jot down her lists and then rip them out when she's done.
They were just loose leaf all cut to size and each page stamped with the little A muse owl.

So glad this project is done and outta my house.
I swear I kept looking at it and judging myself, just insane.
And I am happy to report she liked it....phew!
Never realized how hard it would be to find all things owl.
But once everything comes out that I saw at CHA, the owls will be everywhere!!
Tuesday, September 25
Busy Busy Busy
I am an assistant all day at work.
I answer calls.
I make up excuses why my boss makes mathematical errors.
I set up appointments.
I keep him organized and on track, keep the office stocked.
Then I go home.
And I swear I am Max's assistant.
I set up appointments.
Phone calls with teachers and doctors.
Make excuses for him as to why he forgets everything.
Make dinner and keep the cabinets stocked with food.
I am tired of being everybody's assistant, I swear.
The kid is still struggling with school and homework, which just means more calls from school and more meetings with teachers who talk to me like I am one of the kids...sheesh.
But hopefully (pray!) things will calm down soon because there is only so much this mom can handle.
We're having trouble sleeping these days too, which makes the days even more of a struggle.
School stress is keeping him up at night, or maybe it is this....
Max and I went to the Thrift store this weekend in search of Halloween costumes and it was 1/2 price weekend...Score!
We found tons of spooky stuff to add to our house for that whole creepy Halloween decor.
Max found that cool clock candelabra and it was only 50 cents.
We almost bought a bunch of Barbie dolls to dismember and place in glass beekers, but I decided that this baby doll was scary enough.
Max wants to remove an eye and bleach her, not sure where he got that idea.
But it would probably make it even creepier.
Yep, we are twisted like that.
I also finished up a huge project for this Owl Swap I was in and sent it off, I would show you but then it would ruin the surprise for my partner, so you'll have to settle for some pages.
That's my nephew's nickname, 1/2 man 1/2 amazing.
He uses it for gaming and stuff.
He got it from wrestling although Max thought he made it up himself.
Almost all of it is Dude Designs, love that paper. 
And here's my brother juggling and Max being Max.
I feel like this page is missing something, but I made it about 2 weeks ago and have decided to just let it go.
Know that feeling?
So, if there are any other mom's out there struggling with school too, trying to make sense of "new math", fighting with kids to write definitions, attempting to decipher a kid-written assignment notebook....I'm with ya!
Thursday, September 20
Shhhh...
Man, it is so quiet around here.
Maybe Simone was kidnapped?
Maybe she decided blogging was a waste of time?
Maybe she doesn't like us anymore?
Nahhhhh!!!
I am just trying to work out some issues with a struggling 6th grader and school with new teachers and stuff that is sucking my will to live.
As well as mounds of homework that when I am done I don't even want to think anymore.
So, know I am here and so sorry I am neglecting my little blog.
But I will post the projects I have been working on as soon as I take some pictures and if you wanna see some Halloween goodies you can always check out my Halloween blog.
I am reading most of your blogs and when my brain is in full function mode, I will be commenting more, I promise!
I will return shortly.
Promise.
Tuesday, September 18
Copic Tutorial
So you went out and bought the markers and now you don't know what the heck to do with 'em, right?!
Yeah, me neither for about 2 weeks.
So, I thought that the tips that I have shared about Copics, here and here was all good but I think pictures are so much better with step by step instruction, don't you?
I will do my best to explain but keep in mind that I consider myself a beginner as well but some of these tips and techniques are invaluable and without them I would still be cursing at my markers.
Basic Copic Coloring Tutorial
1. Start with your light color on the image, here I laid down a line of yellow on the veins in the leaves.
 2. Start adding a little green with your lightest shade. I also blended the yellow from step one as well. If the color doesn't seem quite right, remember, this is just the beginning and we will be layering to achieve the desired look.
 3. Now we are going to add some darker green. This is truly the bestest tip I ever got for using these markers...Thanks Michele!
You will take your lightest green marker you used in step 2 and "pick up the darker green" by rubbing the light green marker tip onto the dark. This will not ruin your markers, don't panic. 4. Now with your darker shade, begin added the darker green to the left side of the leaves, I am imagining that the sun is over on the upper right of this image. If the darker green "wears out" just pick up a little more color from that dark green marker.
5. I also used my yellow with the dark green to do some blending and shading, you can see the green on my marker tip. (again, don't worry it will go back to yellow when all the green is used up. 6. See the color "building"? That is the dark green I am using with my yellow and light green and see it all coming together?
 7. Here you can see the preliminary coloring, but it is not really blended very well.
 8. So, I took again, my super light green and used it to blend and correct as well as my yellow without any green on the tip. See how my coloring is a little "sloppy", well you can fix that simply with a white gel pen later.
 9. Now we are moving on to the berries. For this I am using my pink and crimson. I will use the light pink to pick up the crimson color for my shading.
 10. This is what it looks like when you scribble out the color, or if you want to see how "dark" your new found color will be. I like to check what color I will get from putting the 2 colors together before I actually put it on my image.
 11. This is just a reminder...See that sun, that's where it is in my imagination, so I have to make the left sides of the berries darker. You can see I laid down a little pink to start.
 12. Now I used the pink to pick up the crimson and shade in the berries. Then blended with just the pink alone.
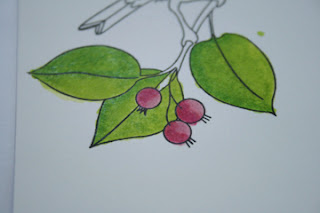 13. I just colored in the branch with brown because it was really too skinny to get crazy with shading.
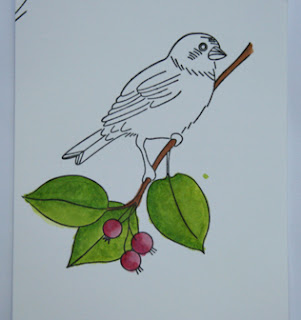 14. And...just so you know...that was not the first birdie I tried to color, this was!
Ugh!! It was horrible. I couldn't get it to work no matter what. So I chucked this little guy and started with the leaves first the second time and then let it sit for about a week without the bird colored at all.
I was afraid I would mess it up like this again.  15. I finally got up the courage and colored the bird again, slower that time and I still don't love it but it is way better than my first attempt.
The stamp is from Martha Stewart. I added the highlights to the berries with a white gel pen.
* So remember, when you are going to color something, stamp the image twice, that way there is less pressure to get it right the first time.
* Use your lightest color first and be aware of where your light is coming from in the picture.
* Work slow and blend, blend, blend with your lightest color.
* Have fun with it, if you make a mistake, it's only paper, right?
Oh and one last thing...
I have to know.
Is it [coh-pic] or [cop-ic]??
I have heard it said both ways and so I have been saying it both ways as well, but I really must know.
If anyone knows fo' sho, please fill me in.
Monday, September 17
Is this Thing On?
test...test....Hello.....
BASKETMOM.....BASKET....MOM.....
BAS...KET...MOM....BA...SKET...MO...MMMMM
Basketmom!
Yep, YOU, I'm calling you....
Please report to the principal's office.
Or just shoot me your email address for the Halloween Swap, we're missing your info.
We need it ASAP.
Anyone who knows the Basketmom, tell her I'm looking for her.
In a good way.
That is all.
Resume your day.
Friday, September 14
Randomness
Yep, it's Friday again and there is a weeks worth of nonsense just whirling in my head, so here goes...
* Made up two new words last week.
I make up words all the time, I know I am not the only one.
Spookify: to make something spooky or scary.
ex. I can't wait to spookify my house for Halloween.
KaWow!: combination of kaboom and wow, when something is so amazing or cool it explodes in your mind.
ex. The group of people who have signed up for my Halloween swap are really KaWow!
* This contest to win a trip to CHA next year in LA is really amazing and the other prizes ain't too shabby either!
*I feel like I need these handpainted tiles but don't have a clue what I would do with them once I get them.
*Drank coffee last Friday morning and I swear I had a stomachache for 2 days.
I don't think my tummy can handle coffee anymore.
Why does that happen?
Can I really be that old?
* I am struggling through 5th and 6th grade homework these days because of my afterschool babysitting gig.
Love the daily reminder that I know less than a 10 year old.
And the recipient of my sitting talents goes to a different school than Max and all his homework comes home in spanish.
So, if you thought 5th grade math was a doozie try it in a language you barely learned in high school.
* I definitely feel I need this Bakers Edge pan.
Who doesn't love brownies with perfect edges on each one?
And I hear you can make killer lasagna in it as well.
It's now officially on my Christmas list.
* I (reluctantly) have started my Christmas list.
I am a total grinch about Christmas and don't even like to think about it til at least Thanksgiving.
But I never know what to tell people to get me.
What do I want?
And I've got a lot of people who ask this question.
So, I figured, keep a running list, everytime you are out shopping, jot down the things you want.
Kinda like window shopping, on to a list.
* I'm working on my owl swap which is due to be sent out on Monday.
Don't worry, I'll show you if I finish.
I mean when, When I finish.
I, like many other people, stress myself out for no reason about swaps.
Especially if you see that your partner's got skills.
And my partner has mad skillz.
So, I put the pressure on myself that this swap must be the bestest thing I have ever created, in fact the most awesome thing ever created in the history of time.
Needless to say heavy drinking has been involved in the process.
* I'm taking out Max's Spooky Town this weekend and I don't even care that is still September.
I hate taking it all out, setting up, just to put it right back in the boxes.
So, we are officially spookifying the house starting now.
And I already bought this little guy about a month ago, as soon as they started putting them out.
We will stay Halloweened til about November 10th too.
Just because I won't want to have to put it all away.
* Has everyone seen the goodies at the Target dollar spot lately?
Tons of scrappin' goodies, of course I started to use and didn't take a picture of...stupid me.
If you are buying from the spot, I don't recommend the gel pens.
I was excited as you to see them there and better yet...a brown one!
But 2 of the 4 that came in my pack fell apart immediately after I took them out to use them.
And the ink is very drippy, so more comes out than necessary.
Not good.
* It's going to be a high of 60 degrees here tomorrow, nothing like going from 90 to 60 in a matter of days!
Funny how when summer is ending, 60 is like freezing and we start to pull out coats.
Then, when winter is ending, 60 is like shorts weather.
Needless to say I will be sporting a sweater and jacket on the soccer field tomorrow.
But then again, I am one of those "always cold" people.
Have a lovely weekend peeps!
More HS Flowers
This is another one of my Mock Swapp Flowers.
But I had a thought that coloring it on the back side with my Copic Markers would be cool.
It wasn't as "cool" as I envisioned, but it worked.
And it dried super fast which was really the most pleasing part. This petal stamp is from Pick A Petal Stampin' Up set.
The brad is from Target's dollar spot, if you haven't been to Target lately, you've been missing all the goodies.
Card is from A muse.
Greeting is an old sticker, not sure of the brand.
Wednesday, September 12
My own HS Flowers
Like many other crafters (you know who you are) I tend to hoard supplies, even collect a few precious ones and I think some of the reason is my thrifty-ness.
Ok, I'm cheap.
Poor, is more like it.
So, when I buy something I really like, I tend to hold on to it, admiring it's awesomeness through its original packaging.
Some things I even remove from the plastic and caress, gently.
And other things I may use just one of two in a package of 6 because I want them to last forever. These Heidi Swap Flowers were like that for me.
I loved them the minute I bought them, like 2 years ago, and have only used like 2.
Because they were like $4 for the pack and my calculations tell me I better really like what I'm working on to add one of these pricey babies.
So, I had a thought last weekend...
What if I could make my own, something similar at a fraction of the cost.
I do this quite often when I am shopping at the LSS.
I ask myself, often, can I make that myself?
If I can, I don't buy, I attempt to make first, which is usually way more stressful than just buying the thing.
But I had a thought about these flowers, that I could easily recreate them.
I have flower stamps.
I have white ink in several forms.
So, I did.
And this was my first attempt, White Craft Ink on Vellum, embossed with White powder.
Not too bad.
And I love the sheer flower. While making your own Mock HS, be sure to be careful and don't burn the vellum, hate when that happens!
Stay tuned for my second attempt, it is so Heidi-esque it is hard to tell the difference!
Tuesday, September 11
Turtle
It has been a crazy couple weeks in the Collins' house.
Started school. (no pictures, that's not "cool")
Started soccer, so we are a family that is officially ruled by soccer schedules for the next 6 weeks. You soccer moms know what I'm talking about.
Started my afterschool babysitting gig, which is making me appreciate only having one and Max appreciate that he is an only child.
So, things are crazy.
Then again, when aren't they?
But I am crafting like crazy.
With a playmate for Max everyday, he is occupied for a couple hours outside me coming in to stop any bad boy behavior, so I have literally had at least an hour a day to do something, so I have plenty to share for a while.
I am still playing with the Copics.
I swear I must have like 30 hours of practice under my belt by now and I am actually starting to like them.
I don't love them, but I now have some small admiration for them.
I kinda feel like I know what I'm doing now, so that helps.
Got this little fella from my friend Michele, I think it's Whipper Snapper?
I actually colored him twice, the first time was less than good, so I tried again and am really quite pleased.
This is probably the best Copic coloring I have done so far.
I have started a write up on how to use the Copics, or at least what I have learned with step by step pictures, but anyone who has blogger knows how long it takes to load 20 pictures into an entry at night...sheesh.
So look for that this week if you are struggling with your new markers like I did for about a week.
Also, completely off topic, but so worth passing along if you have a picky eater like me...
I get this free magazine, Food and Family which is by Kraft foods, if you don't get it, you can sign up for free and get it too, HERE, and I tried this recipe that was delicious and even Max ate it.
Now that's something.
It was no fail pan sauce and it was so simple and fast...You really must try.
And I even used No Yolk noodles and Fat free cream cheese and he had no idea, now that's something.
I actually have nothing but wonderful things to say about everything I have tried in this magazine, all simple and most delicious, so if you're looking for some new ideas, that's a great spot to start.
Monday, September 10
This is ME Journal
Finally got all caught up on my This Is Me Journal.
Here's a look at the cover.
 In case you haven't seen these challenges yet, they are all posted HERE and they have really been a fun little project that has really made me ask myself some cool questions.
You can use any sort of "journal" or album you want to keep all your pages in, so for this project I used the binder from the Making Memories catalog I got back in 2005 at CHA. I have been holding on to this binder, thinking...someday I'll use it, someday.
Well, finally I have a perfect use! (or remembered I had it)
I covered the spine and most of the cover, so you can't even see what it's original purpose was and it is a sturdy little binder.
The pages inside measure 7.5 x 8.5 (I know, weird size) and have 6 holes. I kept one page from the original catalog as a guide to make the holes (good thing I thought of that when I saved the album!)
There have already been six challenges, the most current one is HERE but you can join in now and work from here or back track and complete them all or just the ones you want...Really, it's that simple.
Here are my pages, so far (all but today's challenge)

 This was my genius moment so far making all these pages, I used the negatives from my American Crafts stickers to make the title letters for this page. Really it is the only cool and creative thing I've done in the whole album thus far!


All the pages were done with the Scenic Route, Ashville Collection and I can't get enough of it. I just love how easy it is to use and the colors are just so wonderful, I can't stop using it on everything!
I'm so proud of myself for actually completing these challenges for a change and now that I am caught up, I think the 2 pages a week (Mondays and Thursdays) will be no problem to keep up. Plus, I am loving the questions. (they would also make some good blog posts, if anyone is looking for things to write about!)
Friday, September 7
Rhin-o's Birthday Card
Over the weekend, my nephew turned 15! (same nephew who got the cash in the cool envelope)
Now that's scary...driver's ed, high school, girlfriends...eek!
So glad my little guy is just 11, we have enough problems with 11.
Made this little card for him because we have been calling him Ryn-o since he was a baby, in fact we used to call him Baby Ryn-o, but now that he is like 5'7" it seemed a little silly to continue doing that.
And even though he is a big guy now, I knew he would appreciate a talking Rhino.
He often says to me, "you like making yourself laugh don't ya Monie?" (he's called me that since he was a baby and couldn't make the "S" sound.)
I have a tendency of using the word balls and nuts around him, just to make myself laugh.
And I always tell him..."yep!"
So, I'm sure he will appreciate the little talking Rhino and probably think to himself...I bet she made herself laugh making this one.
Yep! I sure did, I think it is those teeth that really make me laugh.
Card details: Stamp-Zoofari by SU!, PP-Chatterbox, Colored with- Prisma pencils and Gamsol, Scallop Punch by Marvy, card measures 4x4.
Thursday, September 6
Halloween Swap News
Well, thanks to everyone who has jumped on my spooky bandwagon and signed up for the Bubble, Bubble, Swap and Trouble!
So far it is turning out to be some of the most fabulous blog crafters I know which is truly exciting.
Be sure to tell all your bloggy buddies to join us, the more, the scarrier.
And it is not to late to join us!!!
Details are here!
And if you are interested in all things Halloweenie, you don't want to miss out on all the creepy cool ideas and news we will be posting over at The Witches' Caldron.
Gift Card / Cash Holder Tutorial
Well my little nephew turned 15 over the weekend and what does every teenage boy want for his birthday that is the right brand, size and color?
Money!
So, I knew that the envelope gift card holder I saw demonstrated over on the Scrap In Style Tv website would be the perfect thing!
If you haven't checked out the webisodes over at SIS yet, you are really missing out, this is just one of many fabulous ideas over there and most in video form....even better!
You don't have to join to view the latest view, to give you a sneak peek and that is where this little tutorial is featured, at the very end of the Tinkering Ink webisode.
Envelope Giftcard/Cash Holder Tutorial
Step 1: Take an envelope, the larger ones work better for giftcards but any size really would work for cash, and fold the sides in like so and then fold down the top.
Step 2: Make a little insert to "hold" the cash or card and is also where you would put your greeting. I eyeballed the size of my paper and it worked just fine. I am using a colored paperclip to hold the cash. The paper is by Dude Designs. Step 3: Place your "card" inside the envelope with cash/card clipped to it and fold shut.
 Step 4: Make a band that will hold the envelope holder together. I used a strip of paper and just wrapped it around my folded envelope and then cut to size and glued, no measuring here either, aren't you loving the simplicity of this! I added a scalloped circle with a skull rubon and printed his name for the band.
 Finished!
It's really that simple.
Here's the finished envelope holder, like a little present all in itself. So, check out SIS if you haven't, this was sooooo not my idea in the least bit and it would be great to have a few more sistahs! (I'm spazzgirl over there too!)