


So much to post.
*cough cough*
So many cool things to show you.
*hack sneeze*
Want to type....Growing weak....
Sorry for the absence, caught a nasty flu bug that even my trusty Vitamin Water, greatest stuff on earth, could not banish and I am super sick. Even too sick to stamp!
Haven't even looked at email in 2 days, so if you sent me something, I'll get back to you tomorrow.
Back to the couch.
*sneeze*
Anyone got a killer remedy for the worst head cold on the planet and bronchitis?
Tuesday, March 27
Pardon This Brief Interruption...
Sunday, March 25
Thank You
Just wanted to say Thanks to everyone for all the great suggestions for my video tutorials. So many great ideas to choose from it was a hard choice.
I had hoped to post this sooner but it seems that some wicked little flu bug has made it's way into my house and now I am sicker than sick. Not even my trusty Vitamin Water has saved me. No worries though, sick or not, I made that video. Yes, I sound like Harvey Fierstein but the show must go on.
My first video will be ready soon after a little tweaking from my director/producer. And it is featuring, drumroll.....
A Shaker Card!
Very simple tutorial, I know, but many seemed to want to see it and who am I to deny the people. Also, I showed a cool trick for embossing using Classic(dye) ink! Yep, you heard me, embossing without Craft(pigment) ink.
So, the winners....
Katie (1st shaker card suggestion)
Allison (embossing)
Tara(I'm using your fab idea for the next one!)
Email me your addresses and there is a little something coming your way! spazzgirl555@yahoo.com
So here's a little thank you card for everyone using Seeing Spots. The card is 11.5 x 8.5 (scored at 5.5). More videos in my future now that we kinda know what we are doing and I have a few ideas up my sleeve. Thanks again!
Wednesday, March 21
Sweet Treats for Everyone!
First a treat for me! The last treat is for all you!
Katie fixed my blog banner for me. YAY! I tried my hardest to figure out the whole HTML nonsense and it was driving me insane, so she offered to help me out and Voila...All is right in blog world now. Huge Thanks to Katie!!
Also, got to work this morning and read my horoscope:
There is an element of genius to the day that might inspire you to be someone much greater than you ever thought you could be.
So I got that going for me, which is nice.
And what could be sweeter than this RAK card I received from Leslie Brown. The shaker part of the card compliments the foamy top so well, I just love it. My little boy loved shaking it for a bit and says it is his favorite. Thank you Leslie for sending me this tasty little treat, I really love it and it makes me want to make a shaker card. (or have a nice latte) 
Yes, pay attention now, if you made it this far done in my post and are actually still reading my ramblings...Thanks btw.
While my baby bro is in town, love that kid, for spring break, he has agreed to use his camera and mac on loan from school and take a few videos of me doing something crafty. Yep, that's right, a reall tutorial with words and moving pictures. I figured it was a good way to show my girl Greta things that I can only explain so well over the phone or show something cool that you just can't quite grip with still pictures. I sometimes need to see something to really understand...kwim.
So, here's where you come in....
All you loyal readers (thank you btw), lurky-loos, first-timers - I need some suggestions, ideas, requests!! What do you wanna see, learn???
Don't be shy! Speak up.
I really don't think I have anything mindblowing to share or are really that interesting, so I need your help.
Bonus!!!! (glad your still reading or you may have missed that!)
Any person who makes a suggestion and I use it.....Free stuff coming your way.
So speak up people! Get free stuff!!
Filming this week, so act fast. I'm ready for my close-up...Not!
Tuesday, March 20
Two More Mail Treats!
Since I joined the RAK (random acts of kindness) blogger list on SCS, I have been getting so much good mail! I love it.
This first card is from Cindy Keery who is truly an amazing stamper. She has all kinds of fabulous cards in her SCS gallery and on her blog Imagine.Dream.Create. She is also makes fabulous watermarks, so if you are in need of one, check out her samples.
Thanks Cindy for the great card, the watercoloring is truly amazing and I love the little bling in the center, too cool! The second card is from Beate. When I was talking recently with a fellow stamper, I asked if she had heard of Beate or seen any of her amazing work in the Stampin' Up! publications. Her response, "She is legendary." And she is! Her card is so beautiful and wonderfully designed. And the color combination is so much better in person. For more inspiration, check out her blog, Fresh&Fun.
Thank you so much for this great card, people who have seen it sitting on my mantel and commented on how cool it is with the great window sheet front. Cracks me up to look at the picture of the card because you can clearly the camera reflected in the card.
Thanks for the great card. Ok, now back to work on my unfinished projects with deadlines quickly approaching.
Friday, March 16
Bit 'o The Green
St. Patrick's Day is one of my favorite holidays, second only to Halloween. A holiday that celebrates the color green and us Irish folk (not to mention the drinking)...what's not to love?
My grandma Collins was way into our Irish heritage and always had tons of the Irish in her house and made a huge deal about St. Patty's day and it think it really stuck with me.
So, every year, I make a 4 pound loaf of Grandma Gibby's Irish Soda Bread, wear a bit 'o green (but then again I do that a lot of days), listen to those bagpipes, and throw down a few green pints.
This year we are venturing down to the parade. I haven't done that in years. My grandpa used to drive one of those tiny little cars in the parade with the Knights of Columbus and after he passed away they had a special float to honor him and all the grandkids got to ride in the parade. That was super fun. And way before I was born, my aunt was in the St. Patrick's day court, right below the queen.
I haven't even taken Max to the parade before because quite frankly, March in Chicago is not always the best weather. But this year we're there. 40 degrees will hopefully feel warmer in the sun. I hope.
I have had a completely productive week, made 10 cards, 1 scrapbook page and  an apron. None of these were on my Must-do list, but I still made stuff. Does that count?
Some of these cute little shamrocks, which were $1 stamps from Michael's years ago, are hopefully arriving at some bloggers houses today or tomorrow. Simple card. I tried the blender pen again, I am not the best at that thing, but a little glitter can cover any poor blending!
My grandma had a ton of irish sayings/blessing all over her house and this was one of my favs:
May those that love us, love us.
And those that don’t love us,
May God turn their hearts.
And if he doesn’t turn their hearts,
May he turn their ankles,
So we’ll know them by their limping.
Lá Fhéile Pádraig Sona Duit
(Happy St. Patrick's Day!)
Thursday, March 15
Clear Button Tutorial
As promised....
The Clear Button Tricks and Tutorial
As I said the other day with my Squares page of Max, I learned some cool new tricks using Clear Buttons while I was in a blizzard in Michigan a couple weeks ago and this is some of the coolness I learned.
Faux Etched Glass Technique
Supplies
1. Sand the Clear Button. Be sure to sand in one direction. You can see what a difference sanding alone makes to the button.
 2. Rub sanded button with embossing buddy.
3. Ink Stamp with Versamark and lay face up. Place sanded side down onto the stamp and press til you see the image. 4. Using your handy tweezers, dip your inked button into the embossing powder.
 5. Using those tweezers, heat the embossing powder.
6. Voila! You can also use colored embossing powder for a different look. On my Max page, I used white embossing powder. Here it is in Gold.
 Here is my finished card using my button
 Here is a close up look at that button.
The dark colors really make the etched glass look show up well and I love how it adds the perfect touch to this super simple card.
I love the Stampin' Up! Clear Buttons because they are so thick and there is really no fear of melting them before the embossing is complete.
Thanks again to the two talented ladies that demonstrated this cool technique that made me use my buttons.
Finally!
All Supplies Used on the Card are Stampin' Up!: Stamps (Paisley Background, Sincere Salutations, Looks like Spring), Cardstock (Cranberry, Close to Cocoa, Marigold, Cool Carribean, Very Vanilla, Chocolate Chip), Ink (Versamark, Chocolate Chip), Accessories (Clear Button, Twine, Square Punch, Stipple Brush)
Tuesday, March 13
Page for the Day
I should be working on projects that actually have a deadline, but instead I cranked out this 8x8 page while I made dinner. I was actually impressed that I could do both things at the same time.
I had one problem when I got a smudge on one of the squares, but that just gave me the idea to embellish it a bit and then I jazzed up each one, making the layout even better.
The picture is from 2 years ago. I went on a field trip with Max and while we were riding a trolley through downtown Chicago, I saw Max intently looking out the window and snapped this shot.
I love it.
My mother couldn't understand what exactly I was taking a picture of, "So, you just take pictures of anything now?"...but I always knew it was there. The look in his eye. The innocence, the intrigue, the curiosity...that's what I see in this photo.
It's always easy to scrap pictures you love and this one was a breeze, even while I was cooking up tacos!
 All supplies, except the staple and the stitching, are Stampin' Up!©. One of the coolest things on this page is the little button in the lower right corner. It is a clear button that was jazzed up to look like that.
I learned some cool techniques at my Stampin' Up!© retreat last weekend and this was definitely one of them. I had been hoarding my buttons for over a year and the cool things that Mary MacKeller and Beth Zuller were demonstrating last weekend made me bust those babies out and actually use them.
I will be posting the tutorial for a Faux Etched Glass Button later this week. I used two of the techniques together to create this cool look.
Be sure to stop back this week, you won't want to miss this cool trick!
Will Return to Crafting in a Minute....
If you are looking for a great new card or project, I'll post one later.
But for now...
I had a dream last night.
I was in Vegas.
It was warm and wonderful.
I was wearing a new dress.
My hair looked fabulous and I was at least 10 pounds lighter.
I always dream myself hot.
Why not?
There was a man.
Dark and handsome.
Totally hot.
We were walking down the strip, headed for the Monte Carlo.
I was on cloud nine.
Then the alarm went off, playing some horrible Van Halen song.
Memory?
Perhaps.
Premonition??
I hope.
Ok, back to work.
Crafts later.
Friday, March 9
RAK - Debbie Seyer

Debbie Seyer you RAK my world!
This card is wonderful and my very first RAK, I couldn't have been more thrilled to get it. Her blog is great, it has a TON of wonderful projects and ideas.
If you are a blogger and would like to join our RAK group of bloggers, you can get more info HERE. (but you need to be a member of the RAK group, which is free you just have to join!)
Thanks again Debbie, I love the card!!
Card uses Polka Dots and Petals and Polka Dots and Paisleys stamp sets in the Spring Mini Catalog and that Ticket corner punch (which now I must have!) and Pink grosgrain ribbon.
Thursday, March 8
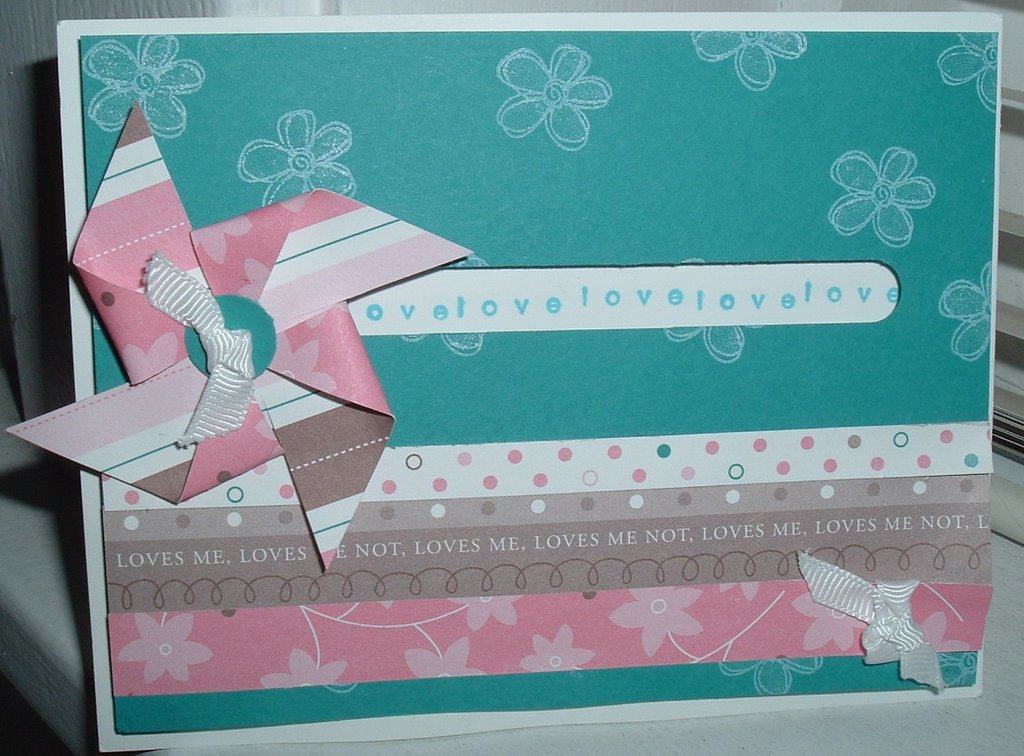
Pinwheel Spinner Tutorial
Due to popular demand, aka "How the heck did you make that Pinwheel card?", I am posting simple instructions. I really learned how to make the spinner from SCS and they do a wonderful job on their tutorials, so I am in no way even in the same league...But here it goes.... First, you need stuff, also referred to as supplies:
Cardstock (two pieces, base = 8.5x5.5 and top piece = 4 x 5.25)
Dimensionals or pop dots (whatever they call them in your neck of the woods)
2 pennies
Glue Dots
One piece of patterned paper for the pinwheel, double-sided works best!Stamps (optional) For the pinwheel piece I cut my patterned paper to 2 x 2, then snipped in from the corners to the center, careful not to cut all the way through.
  Using a glue dot to hold the tips of the pinwheel to the center, bend every other corner in toward the center. I find it best to let your best pattern be the background and fold the less exciting one in.
 Next you need to create a "track" for your pinwheel to run on with the top piece of cardstock. I like using the Word Window Punch for this. It eliminates the need to measure or try to get anything straight. (both of which I am terrible with) I just make sure to start with my first punch in the center with the punch all the way into the cardstock as far as it will go. Then continue to the two sides making sure the punch is pushed into the paper as far as it will go.
You can also use your paper trimmer for this step, which is exactly how it is explained on SCS, but I find this method so much simpler.
Now, lay the top piece onto your scored card as a guide to stamp out words along the track. You can make a pencil mark to guide you or, if you are careful and the stamp is small, stamp directly through the opening. I used a piece of patterned paper just to add a little color to the card. Once you are finished with all your stamping, place dimensionals all over the back of your top piece. Make sure to leave room around your track so that your pinwheel can spin. Disregard that extra *Happy*, I wanted to see how the color would show up on the card, so I used the back that no one will see, well, except you!
Next you need a penny sandwich, 2 pennies with 2 dimensionals between them. Attach that to your pinwheel using a glue dot.
Now carefully fit the pinwheel into the track. Next remove the backs from your dimensionals and afix to your card. Voila! Finished Card.
Really very simple.
Hope these instructions were easy enough to follow.
Tuesday, March 6
Back from the Blizzard!
My weekend excursion to Holland, Michigan turned out to be way more treacherous than I expected. It began snowing before we headed toward Michigan and as we got further and further around the lake, it became worse and worse. The roads in Michigan were not even remotely plowed and there had to be at least 6 inches on the main roads. No one shovels either in that great state, so it made for a very wet visit.
I got a ton of great new samples from swapping and from our Make and Take session on Friday. We got some great ideas for our Stampin' Up! businesses on Saturday and it was great to see so many teammates there to enjoy it with. I am always looking for new tips and techniques and Saturday was jammed packed with creative ideas. I tried to absorb as much of their creative energy as I could before we headed back out into the blizzard and back home, safe and sound with beautifully plowed highways and shoveled walks.

This cute little basket made it all the way through the blizzard and back again. The idea is a total case from Erika Martin and complete and total credit goes to her for supplying the dimensions and idea. It is just another modified 2-4-6-8 box and adds to my list of ways to use that idea.
I love how great it works with the double-sided papers and so simple to re-create. This would make a great project if you are looking to create a few for Easter or a little spring treat.
The papers are from the new Spring Mini Catalog, Petals and Paisley Designer Papers. I also used the Mini Tag Punch, Bodacious Bouquet Classy Brass to do the dry embossing, and my Crimper to make that neat little handle. The "for you" is from the Happy Everything stamp set and in my opinion, one of the most versatile sets in the entire catalog.
There is a current special with the new papers and the cute Polka Dots and Paisley set,my samples are HERE, but only til March 30th.
See that cute little pot in the picture?
It's Max's little Clovers he got from the Target Dollar Spot and man those things grow fast. The little pot is so small, the basket is approximately 4 inches if that gives you some idea of its stature. I'm just thrilled the little thing actually sprouted.
And I now have 3 whole plants in the house (not counting the little clovers) and they are all still alive! YAY! I can feel the feng shui.
Friday, March 2
She's Comin' with Me!
 Felt like I didn't have enough little birdies coming with me this weekend to swap out for new cards and ideas, so at the very last minute I made up this little Birthday Beauty.
She is dazzling with her crown (sparkled with Crystal Effects and Dazzling Diamonds) and her brand new dress (cut from Patterned paper).
She was in one of the boxes I got the other day and thought it was a good chance to play with something new and get a little more done for this weekend. The "Birthday Beauty" part is stamped in Craft White and then embossed in White Embossing Powder. That stuff is amazing. It really makes the white print *pop* on any color cardstock. I can't wait to play with that a little more. Now, all I have to do is make 20 of these little babies in the car on the four hour ride to Michigan. Everything is stamped and cut, all I have to do is color and assemble.
I really should have made her little sash out of pink, but Oh well.
Hope this gives someone some ideas for Princess cards of her own.
Thursday, March 1
Good Mail Day
Dontcha just love when you get good things in the mail?!
Well, yesterday I hit the jackpot.
My order from Oriental Trading (which was 15% off and free shipping) that I placed Friday and didn't expect for 10 business days showed up. Everything in the box was fabulous and the things that were chipped, were happily remedied with a quick call. Can you believe they offered me a $20 credit for the damaged merchandise to make up for it?!?! Gotta love that.
My last SAB order for myself came with a brand new little princess set, perfect for a little princess' birthday card and gifts! Also inside were brand new paper, blender pens and white embossing powder. That stuff seriously rocks.
Then I get home and there is a letter from a friend and no bills! YAY!
And to top it all off, Tuesday night, Betti and Barb, the stampgirls, came by to swap a stamp set with me and gave me 90 Chipboard Coasters!!! How cool are they?!
See all the goodies:
So, I have a ton of stuff to play with and I didn't even mention the things I picked up in my Target Dollar Spot. And not a second to play with them. I leave tomorrow for Michigan to do a little Stamping and Swapping and Demoing and I am not even ready. I had a dream last night I got to MI and had forgotten everything, even my clothes. It was a complete nightmare. Someone just kept saying, "You didn't even bring scissors?? What were you thinking?"
Hate those dreams.
I only have them when I am not prepared for something big coming up and I am definitely not prepared.
So, I will be staying up til the wee hours tonight and crafting like I have never crafted before! On the upside, sometimes this produces my best work.
We'll see, full report on Monday!
***SPECIAL NOTE: I am working on a kick ass (yes, I said ass) tutorial on how to make my pinwheel spinner card complete with pictures and tips and everything you can every want, but this last minute crunch will postpone this til first thing next week...Promise!!***
Subscribe to:
Posts (Atom)