


So you went out and bought the markers and now you don't know what the heck to do with 'em, right?!
Yeah, me neither for about 2 weeks.
So, I thought that the tips that I have shared about Copics, here and here was all good but I think pictures are so much better with step by step instruction, don't you?
I will do my best to explain but keep in mind that I consider myself a beginner as well but some of these tips and techniques are invaluable and without them I would still be cursing at my markers.
Basic Copic Coloring Tutorial
1. Start with your light color on the image, here I laid down a line of yellow on the veins in the leaves.
 2. Start adding a little green with your lightest shade. I also blended the yellow from step one as well. If the color doesn't seem quite right, remember, this is just the beginning and we will be layering to achieve the desired look.
 3. Now we are going to add some darker green. This is truly the bestest tip I ever got for using these markers...Thanks Michele!
You will take your lightest green marker you used in step 2 and "pick up the darker green" by rubbing the light green marker tip onto the dark. This will not ruin your markers, don't panic. 4. Now with your darker shade, begin added the darker green to the left side of the leaves, I am imagining that the sun is over on the upper right of this image. If the darker green "wears out" just pick up a little more color from that dark green marker.
5. I also used my yellow with the dark green to do some blending and shading, you can see the green on my marker tip. (again, don't worry it will go back to yellow when all the green is used up. 6. See the color "building"? That is the dark green I am using with my yellow and light green and see it all coming together?
 7. Here you can see the preliminary coloring, but it is not really blended very well.
 8. So, I took again, my super light green and used it to blend and correct as well as my yellow without any green on the tip. See how my coloring is a little "sloppy", well you can fix that simply with a white gel pen later.
 9. Now we are moving on to the berries. For this I am using my pink and crimson. I will use the light pink to pick up the crimson color for my shading.
 10. This is what it looks like when you scribble out the color, or if you want to see how "dark" your new found color will be. I like to check what color I will get from putting the 2 colors together before I actually put it on my image.
 11. This is just a reminder...See that sun, that's where it is in my imagination, so I have to make the left sides of the berries darker. You can see I laid down a little pink to start.
 12. Now I used the pink to pick up the crimson and shade in the berries. Then blended with just the pink alone.
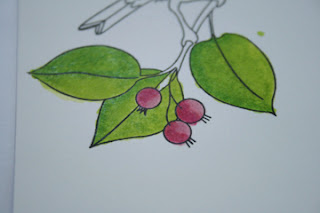 13. I just colored in the branch with brown because it was really too skinny to get crazy with shading.
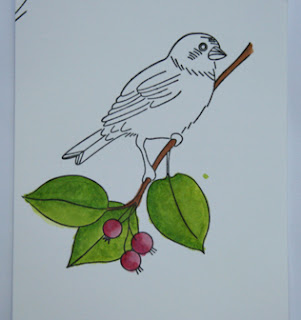 14. And...just so you know...that was not the first birdie I tried to color, this was!
Ugh!! It was horrible. I couldn't get it to work no matter what. So I chucked this little guy and started with the leaves first the second time and then let it sit for about a week without the bird colored at all.
I was afraid I would mess it up like this again.  15. I finally got up the courage and colored the bird again, slower that time and I still don't love it but it is way better than my first attempt.
The stamp is from Martha Stewart. I added the highlights to the berries with a white gel pen.
* So remember, when you are going to color something, stamp the image twice, that way there is less pressure to get it right the first time.
* Use your lightest color first and be aware of where your light is coming from in the picture.
* Work slow and blend, blend, blend with your lightest color.
* Have fun with it, if you make a mistake, it's only paper, right?
Oh and one last thing...
I have to know.
Is it [coh-pic] or [cop-ic]??
I have heard it said both ways and so I have been saying it both ways as well, but I really must know.
If anyone knows fo' sho, please fill me in.
22 comments:
Really beautiful card! thanks for sharing your tips!
Great tutorial. Thanks for sharing
thanks for the tips. I want to get my crap unpacked so I can play with my copics later. I think it's "coh-pic" since that's what the guy at Dick Blick called them when I got mine.
love the sun visual...thanks for the giggle ;)
WOW! Great tutorial....looks to me like you've mastered those Copics!
Very nice tutorial..I loved it and the bird is cute! (The card is cute also)
Malieta:)
I think it is with the long o sound. They used it that way at CHA...weren't you paying attention? I know you hung around that booth for awhile.... : )
beautiful!!
i had never heard of those, but now i am in the know!!
ok ok You convinced me I need these markers. Now to find where they sell them in NC. Great tutorial I am printing it in hopes I can find the markers
You are doing really well with these amrkers...remember not so long ago you weren't sure about them? LOL! Now you are giving tutorials!
I give up on colouring-I'm no good at it. i will just have to keep admiring yours!
(BTW, I've tagged you on my blog!)
Totally love the card and thank you so much for sharing this with us.
This is great! TFS
I also think it's Coh-pic.
Very cool Simone!! Make me want to color :)
so nice! I wish I can draw something like that! I can't even draw a bird... so difficult! LOL
Wow- great tutorial and beautiful coloring! Thanks for sharing!
looks like a lot of fun. I don't have them at this point, but I've enjoyed seeing what you are doing with them.
Great tutorial and especially for a newbie Copic gal! Great job on your shading, you rock! I only hope when I get my set, I will learn as quickly as you have with such nice results! TFS- Deb
I don't have the Copic Markers but one day plan to buy them. You did a fabulous job with your tutorial. . .very easy to follow and the samples are great.
I just wanted to let you know that I added your blog site to my blog roll that I'm currently creating. I'm adding all the bloggers that have commented my blog site at one point or another. Thank you so much for visiting my site and commenting. It's always appreciated!!
Maria
What a great tutorial!!! I really have been missing in action checking out the blogs and am sorry that I missed this. Thanks so much for taking the time and sharing this one!
I can't believe it... I finally learned something new about the copic markers... Thanks for sharing your tip on rubbing tips for colors... I had never known about doing that... wow.
Good job btw.
Oh yeah... I have talked to the CEO at COH PIC and it's pronounced as such... not COP IC. So, now you know FO SHO lol.
Have a good one and thanks for taking the time to share your knowledge!
Jon
Post a Comment