


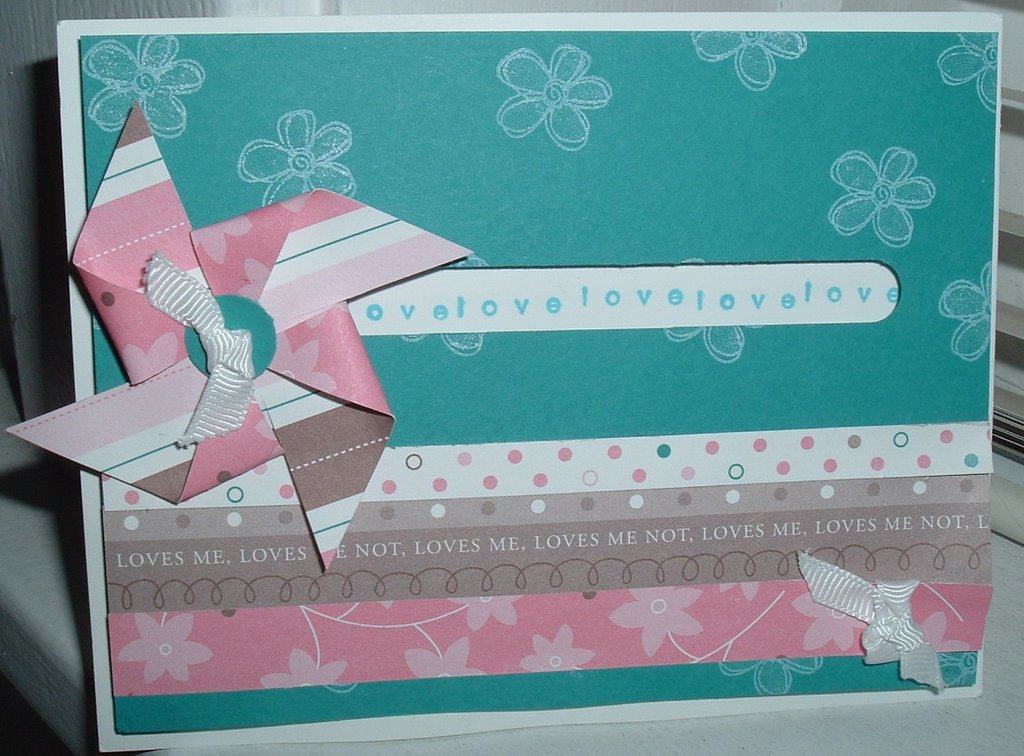
Due to popular demand, aka "How the heck did you make that Pinwheel card?", I am posting simple instructions. I really learned how to make the spinner from SCS and they do a wonderful job on their tutorials, so I am in no way even in the same league...But here it goes.... First, you need stuff, also referred to as supplies:
Cardstock (two pieces, base = 8.5x5.5 and top piece = 4 x 5.25)
Dimensionals or pop dots (whatever they call them in your neck of the woods)
2 pennies
Glue Dots
One piece of patterned paper for the pinwheel, double-sided works best!Stamps (optional) For the pinwheel piece I cut my patterned paper to 2 x 2, then snipped in from the corners to the center, careful not to cut all the way through.
  Using a glue dot to hold the tips of the pinwheel to the center, bend every other corner in toward the center. I find it best to let your best pattern be the background and fold the less exciting one in.
 Next you need to create a "track" for your pinwheel to run on with the top piece of cardstock. I like using the Word Window Punch for this. It eliminates the need to measure or try to get anything straight. (both of which I am terrible with) I just make sure to start with my first punch in the center with the punch all the way into the cardstock as far as it will go. Then continue to the two sides making sure the punch is pushed into the paper as far as it will go.
You can also use your paper trimmer for this step, which is exactly how it is explained on SCS, but I find this method so much simpler.
Now, lay the top piece onto your scored card as a guide to stamp out words along the track. You can make a pencil mark to guide you or, if you are careful and the stamp is small, stamp directly through the opening. I used a piece of patterned paper just to add a little color to the card. Once you are finished with all your stamping, place dimensionals all over the back of your top piece. Make sure to leave room around your track so that your pinwheel can spin. Disregard that extra *Happy*, I wanted to see how the color would show up on the card, so I used the back that no one will see, well, except you!
Next you need a penny sandwich, 2 pennies with 2 dimensionals between them. Attach that to your pinwheel using a glue dot.
Now carefully fit the pinwheel into the track. Next remove the backs from your dimensionals and afix to your card. Voila! Finished Card.
Really very simple.
Hope these instructions were easy enough to follow.
Thursday, March 8
Pinwheel Spinner Tutorial
Subscribe to:
Post Comments (Atom)
3 comments:
if i could follow it and know what you are talking about so can anyone else :)
ok so i meant to type so can everyone else...these kids are driving me bananas and i can't even think
This is so cute! My Grandpa used to make me pinwheels when I was little and I remember him teaching me how to make them too. I have never thought to make a mini one for a card...but I definately will be making one now thanks to you!
Post a Comment